Whistler Packing List: A Year-Round Layering Guide
Pack for Whistler with layers built for wet coastal snow, rain, and village-to-trail shifts. A year-round framework for gear, footwear, and what to skip.
On this page
Whistler weather month by month
Typical conditions from 30 years of daily weather data — use it to see how much to pack for the month you are travelling.
| Month | High / low | Days with rain | Days with snow | Afternoon humidity | Daylight |
|---|---|---|---|---|---|
| January | 1° / -4°C (33° / 25°F) | 6 in 10 days | 6 in 10 days | 57% | 8.3 h |
| February | 3° / -3°C (37° / 26°F) | 5 in 10 days | 6 in 10 days | 52% | 9.8 h |
| March | 5° / -1°C (41° / 30°F) | 6 in 10 days | 6 in 10 days | 51% | 11.5 h |
| April | 8° / 2°C (47° / 35°F) | 6 in 10 days | 5 in 10 days | 49% | 13.5 h |
| May | 13° / 5°C (56° / 41°F) | 5 in 10 days | 2 in 10 days | 48% | 15.2 h |
| June | 16° / 9°C (61° / 48°F) | 6 in 10 days | 1 in 10 days | 50% | 16.1 h |
| July | 21° / 13°C (70° / 55°F) | 4 in 10 days | Rare | 46% | 15.8 h |
| August | 22° / 13°C (72° / 55°F) | 3 in 10 days | Rare | 44% | 14.3 h |
| September | 18° / 9°C (65° / 48°F) | 4 in 10 days | 1 in 10 days | 47% | 12.4 h |
| October | 10° / 4°C (50° / 38°F) | 5 in 10 days | 4 in 10 days | 55% | 10.4 h |
| November | 3° / -2°C (38° / 29°F) | 7 in 10 days | 6 in 10 days | 59% | 8.7 h |
| December | 0° / -5°C (32° / 24°F) | 6 in 10 days | 6 in 10 days | 58% | 7.9 h |
Travelling on specific dates? Use our What to Wear Planner for the weather, outfits and a packing list for your exact days in Whistler.
Averages for 1991-2020, modelled from Copernicus ERA5-Land and ERA5 reanalysis via Open-Meteo open data (CC BY 4.0), adjusted to Whistler's elevation. Modelled afternoon highs can read 1–2°C below airport weather-station records.
Packing for Whistler is less about owning the warmest jacket and more about managing water. The resort sits in a coastal rainforest climate, and local guides describe rapid shifts between sun, rain, and snow even within a single day. That combination of low village elevation and much higher alpine terrain is the single fact that should shape every packing decision.
The practical consequence is that Whistler rewards thin, adaptable layers over one heavy garment, and it punishes cotton next to the skin. Ski kit that works fine in dry continental cold can soak through here, because coastal snow carries more moisture. Build your bag around a waterproof shell, a warm mid-layer, and a moisture-wicking base, then adjust for the season.
This guide is a year-round framework rather than a month-by-month list, so it avoids repeating the same checklist twice. Where a specific month changes what you pack, the month-focused guides on this site handle those details. Use this page to build the core kit, then layer seasonal adjustments on top of it.
Why Packing for Whistler Is Different
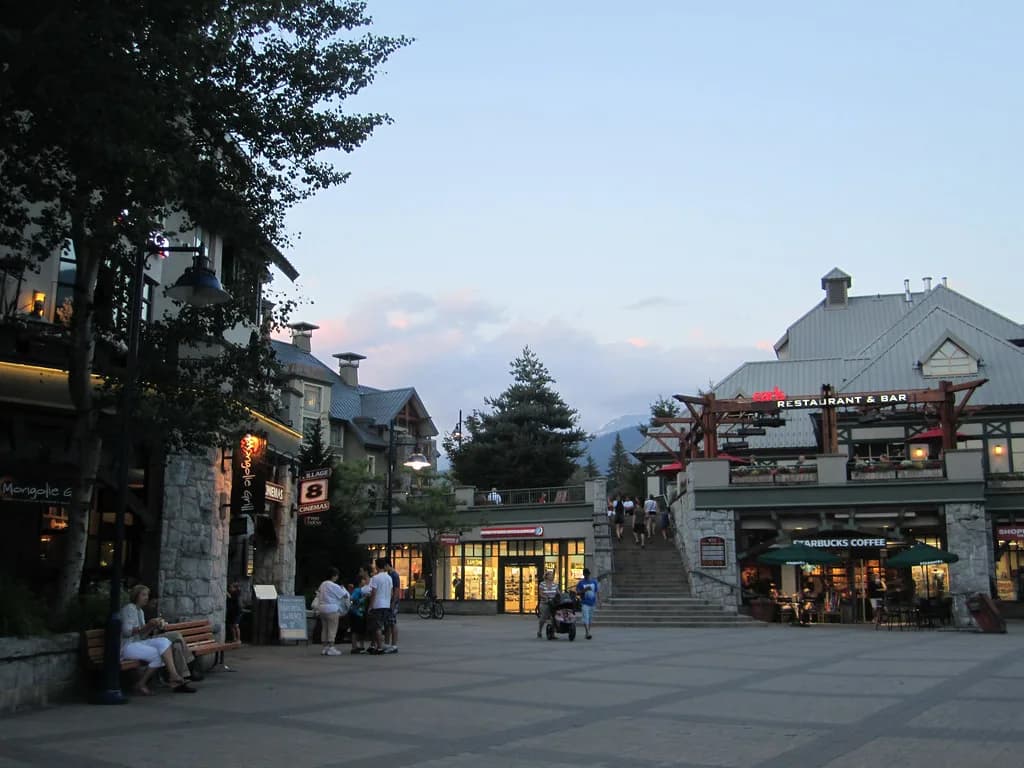
Whistler Village sits low in the valley while the ski terrain climbs far higher, and that elevation gap drives everything. The village can be mild and wet while the upper mountain is snowy and cold, so the weather at your hotel is not the weather you will meet on the slopes. Plan for the elevation you are visiting, not the number on the valley thermometer.
Resort guides consistently stress that mountain weather here shifts quickly, with sunshine giving way to rain or snow regardless of the season. That variability is why a single thick sweater under a shell is a weaker strategy than several thinner layers you can add or remove. It is also why a packable rain layer earns permanent space in your bag, even in midsummer.
Treat any seasonal temperature figure you read, including the ones here, as a historical tendency rather than a forecast. Conditions vary widely from year to year, and a mild December or a snowy November both happen. Check current mountain and valley conditions shortly before you fly, and pack for the range rather than a single predicted number.
The Three-Layer System, Explained Simply
The base layer sits against your skin and does the quiet work of moving moisture away from your body. Merino wool or a synthetic fabric both perform well here, while cotton holds water and chills you once you stop moving. Pack two or three base layer tops and two bottoms for a ski week so you always have a dry set.
The mid-layer traps warmth, and fleece or a light down jacket are the standard choices. One or two mid-layers is usually enough, because the shell does the weather protection and the base handles moisture. A packable puffer doubles as your village jacket in the evening, which saves luggage space.
The outer shell is where Whistler differs from drier resorts: it needs to block both wind and water, not just add warmth. Look for a jacket with a proper storm hood, sealed seams, and adjustable cuffs, and consider a waterproof shell built for sustained rain rather than a light shower. Local outfitters treat a windproof and waterproof outer layer as the piece worth investing in for the coastal conditions here.
Waterproofing Beats Extra Insulation
Whistler's snow is wetter than what falls at continental resorts, and the village frequently sees rain when the alpine sees snow. That means a soaked jacket or pair of gloves ends your comfort long before the cold does. Prioritize waterproof fabrics over thicker insulation, and treat breathability as a close second so sweat can escape during active days.
Gore-Tex and similar waterproof-breathable membranes are repeatedly recommended for this climate because they keep wind and water out while letting moisture escape. If you choose a jacket without a membrane, check for taped seams, a storm flap over the zip, and a hood that adjusts. A jacket that merely resists water will eventually soak through on a long, wet day.
Apply the same standard to your trousers and gloves. Waterproof insulated gloves or mitts beat thick knit gloves in wet snow, and a spare pair is worth the space because one pair will get soaked. A neck gaiter or balaclava protects your face on windy lift rides without the snag risk of a long scarf.
Winter Footwear: Grip, Warmth, and Waterproofing
Winter in Whistler presents two separate footwear problems: the mountain, and the village. For the village, insulated waterproof boots with a grippy sole handle slush, ice, and wet sidewalks far better than fashion boots. Insulated winter boots are a reliable choice, and casual leather boots work well for drier evenings if they are treated for water.
Ski and snowboard boots are a different purchase entirely. Bring your own if they fit well, because a comfortable boot matters more than new technology on a full day. Renting on arrival is a legitimate alternative that saves baggage weight and lets you try equipment suited to current conditions.
Socks deserve their own decision. One well-fitted wool or synthetic ski sock per day is warmer than two bunched pairs, which restrict circulation and cause cold feet. Pack three to four pairs of ski socks for a week and save a separate pair of wool socks for village boots.
Summer Footwear: Trails, Village, and Lakeside
Summer in Whistler splits your footwear needs between alpine trails and the valley floor. Hiking shoes with real tread handle rocky, muddy, and sometimes snow-patched terrain above the lifts, and ankle support helps on uneven ground. Save the light sandals for the village and the paved Valley Trail rather than the alpine.
Even in summer, damp ground is normal on Whistler trails, so waterproof or quick-drying hiking shoes are a better bet than mesh trainers that soak through. Pair them with wool or synthetic socks rather than cotton, which stays damp and promotes blisters. Bring a second, lighter pair of shoes for evenings so your hiking shoes can dry overnight.
Ski and Snowboard Gear: Helmet, Goggles, Socks, Gloves
A helmet is standard on Whistler's slopes and doubles as warmth and rain protection on wet days. Goggles matter more than sunglasses on the mountain, and low-light lenses are useful because flat, grey conditions are common. Check lens options before you travel, and pack sunglasses for lunch stops and spring days when the sun is high.
Beyond the helmet, the ski-specific kit that earns space is unglamorous: a face warmer or neck gaiter, waterproof gloves or mitts, hand and toe warmers for cold snaps, and spare socks. A small waterproof backpack lets you carry water, snacks, and a dry layer on the hill. If you fly with skis or a board, compare airline baggage charges against local rental before committing.
If you are weighing whether to bring your own skis or board versus renting, consider the type of trip you are taking. Local rental shops offer gear suited to current conditions, and delivery to accommodation is available, which suits shorter trips. Travelling with your own equipment favors longer stays and riders who know their setup.
Summer and Bike Park Clothing
Summer packing for Whistler is a genuine second season, not a light version of winter. Valley temperatures sit in a comfortable range that invites shorts and t-shirts during the day, but breathable layers, a light hoodie, and a packable rain jacket still belong in the bag. Afternoon and evening temperatures drop faster than many visitors expect.
For the bike park, long trousers and long sleeves are the practical choice regardless of temperature, because trail-side brush and falls are rough on skin. Gloves are non-negotiable, and knee and elbow pads are worth renting or packing for downhill days. If you plan to ride lift-served terrain, check the park's own current safety guidance and rental packages directly rather than assuming what is supplied.
Sun protection and insect repellent are the quiet essentials of a Whistler summer. High-elevation sun burns quickly, and reflection off snow patches intensifies it, so pack sunscreen, lip balm with sun protection, sunglasses, and a hat. Insect repellent is worth carrying for valley trails around dusk.
Accessories That Earn Their Space
A toque, a neck gaiter, waterproof gloves or liners, sunglasses, and spare socks form the accessory kit that most improves a Whistler day. These small items cover the places body heat escapes and the spots that get wet first. They are also the easiest items to buy locally if something is forgotten.
For village evenings, a warm non-ski jacket is more useful than a dressy coat, since resort style here leans casual and practical. Pack a flannel or sweater that works over a base layer for dinners and patios. Keep any long scarf off the mountain, where it can catch on chairlift equipment.
Small practical items that consistently prove useful include a reusable water bottle, a power bank because cold drains batteries, a compact first-aid kit for blisters, and a swimsuit for hot tubs and spa visits. These are not weather-specific and work across both seasons. Packing them once means you stop rethinking them each trip.
Town-to-Trail Transitions
The gap between the village and higher elevations is the central packing challenge, and a small day bag solves it. Start your day in comfortable village clothes with a base layer already on, then add the mid-layer and shell at the trailhead or lift base. Carry the layers you removed in the bag rather than leaving them behind, because the temperature will drop again on the descent.
For a village-to-hike day in summer, wear your hiking shoes from the start and pack a light insulation layer, a rain shell, water, snacks, and insect repellent. Swap to sandals or lighter shoes when you return to the village. A packable tote or small backpack makes that swap easy without returning to your accommodation.
In winter, the same principle applies in reverse: insulated waterproof boots for the village, ski or snowboard boots for the mountain, and a spare pair of socks in your bag for the transition. Leave the ski jacket on for the walk to the lifts, but keep a dry, warm jacket at your accommodation for the evening so you are not sitting in wet gear.
A Five-Day Winter Packing Example
For five winter days, start with three merino or synthetic base layer tops and two bottoms, which lets one set dry while you wear another. Add one or two fleece or down mid-layers and a single waterproof shell jacket and matching trousers. Three to four pairs of ski socks and two pairs of waterproof gloves or mitts cover the wet-glove problem.
For footwear, bring insulated waterproof boots with good tread for the village, your ski or snowboard boots if they fit well, and one pair of casual shoes for indoor evenings. Accessories are where a winter bag gets comfortable: toque, neck gaiter, goggles with a low-light lens, sunglasses, hand warmers, and a swimsuit. A small waterproof backpack holds water, snacks, and a spare layer on the hill.
For evening wear, pack two sweaters or flannels, one pair of dark jeans or trousers, and your warmest non-ski jacket. If you plan to visit a spa or outdoor hot tub, the swimsuit doubles for that. Leave enough room in the bag for anything you buy in the village, which is easy to do here.
A Five-Day Summer Packing Example
For five summer days, pack three to four breathable tops, two pairs of shorts or hiking trousers, and one pair of long trousers for the bike park or cooler evenings. Add a light hoodie or fleece and a packable rain jacket, because the alpine is cooler than the valley and coastal weather arrives quickly. A swimsuit covers lakes and hot tubs.
Footwear for a summer week means one pair of hiking shoes or trail runners with grip, plus comfortable shoes or sandals for the village. Pack socks that are not cotton for the trail days. Sun protection, insect repellent, a refillable water bottle, and a power bank round out the kit.
If the bike park is on your itinerary, add gloves, knee and elbow pads, and long sleeves and trousers, and confirm what the park supplies or rents before you arrive. Check current trail and lift information with the operator directly. Riding gear is best fitted locally if you do not own it.
What to Leave Behind
Cotton next to the skin is the first thing to drop from the bag, because it holds moisture and chills you once you stop moving. This applies to t-shirts as base layers, cotton socks for ski boots, and cotton underwear for active days. Merino and synthetics dry faster and manage sweat better.
Leave the high heels and smooth-soled dress shoes at home. The Village Stroll is cobbled and often wet or icy, and resort style leans casual and practical. Low-heeled boots with grip handle evenings better and are safer on slushy streets.
Gear rated only for dry continental cold is a poor match here, because coastal sleet will get through it. Consider leaving bulky one-piece ski suits and a single pair of gloves. Skis and boards are worth reconsidering for shorter trips, since renting can save baggage fees and matches local conditions.
Check the Forecast Before Departure
A day or two before you fly, check the current forecast for both the valley and the alpine rather than a single number. Elevation matters more than the village figure, because the upper mountain can be many degrees cooler. Look at precipitation type as well as temperature, since rain in the village often means snow up high.
Be careful with historical averages. Seasonal ranges you find in older guides describe past tendencies, not your trip. Use them to choose which layers to bring, then verify actual conditions before departure. Official winter weather in this area is often characterized by crisp mornings and snowy afternoons, with temperatures shifting noticeably with elevation.
If your plans include shoulder-season travel, check which of the winter and summer packing lists applies to your dates. Shoulder seasons can deliver both rain and early snow, so pack a waterproof shell plus one warm layer regardless. For more granular choices, see what to wear in Whistler in November and what to wear in Whistler in December.
Pack Once, Adapt All Year
Whistler's packing problem comes down to water and elevation, not raw cold. Build a kit around a waterproof shell, a warm mid-layer, and moisture-wicking base layers, then swap footwear and accessories between the winter and summer seasons. Everything else is a variation on that core.
If you want month-specific guidance on top of this framework, this site can help you decide what to wear in Whistler in January and in February. Check current conditions and operator guidance before you fly, and let the forecast settle the last few decisions. With the layers right, the weather stops dictating your trip.
More packing guides for Canada
- What to Pack for Whistler and Vancouver
- What to Wear for Skiing in Whistler: Coastal Snow Guide
- What to Wear for Snowshoeing in Whistler
- What to Wear in Whistler in April: Late-Season Layering Guide
- What to Wear in Whistler in December: Winter Packing Guide
- What to Wear in Whistler in February: Packing Guide
- What to Wear in Whistler in January: Winter Packing Guide
- What to Wear in Whistler in July: Packing for Village Warmth and Alpine Chill
- What to Wear in Whistler in March: Snow, Slush, and Smart Layers
- What to Wear in Whistler in November: Rain, Slush, and Early Snow
- What to Wear in Whistler in September: Layering & Packing Guide
- What to Wear in Whistler Village at Night: Evening Packing
- Niagara Falls Packing List: What to Wear in Every Season
- Quebec City Packing List: Seasonal Clothing and Footwear Guide
Frequently Asked Questions
What should I pack for Whistler in winter?
Start with moisture-wicking base layers, one or two fleece or down mid-layers, and a waterproof, windproof shell jacket and trousers. Add insulated waterproof boots with good tread for the village, ski or snowboard boots if you ride, three to four pairs of ski socks, waterproof gloves or mitts, a toque, a neck gaiter, and goggles. Hand warmers, sunglasses, a swimsuit, and a small waterproof backpack cover most extras. Whistler's snow is wetter than at many inland resorts, so waterproofing matters as much as insulation.
Do I need waterproof gear in Whistler in summer?
Yes, a packable rain jacket is worth carrying in every season. Whistler sits in a coastal rainforest, and fast-moving weather can bring rain or cool, damp air even in midsummer, especially at higher elevations. Pair the rain layer with a light insulation layer for cool evenings and alpine hikes, and choose quick-drying footwear for trails that stay muddy or damp.
What shoes should I bring to Whistler?
You need two distinct types. In winter, bring insulated waterproof boots with a grippy sole for slush, ice, and wet sidewalks, plus casual boots or shoes for indoor evenings. In summer, bring hiking shoes or trail runners with real tread for alpine terrain and comfortable shoes or sandals for the village and the paved Valley Trail. Whistler's cobbled Village Stroll is hard on smooth-soled shoes in any season.
Should I bring my own skis or snowboard or rent in Whistler?
Both options work. Bringing your own equipment favors longer stays and riders who know their setup, but weigh airline baggage charges before deciding. Renting on arrival lets you travel lighter and use gear matched to current conditions, and local shops offer packages with delivery to accommodation. Check current rental options and prices directly with the operator, since those change season to season.
What should I leave behind when packing for Whistler?
Leave cotton base layers, t-shirts as first layers, and cotton socks at home, because cotton holds moisture and chills you once you stop moving. Skip high heels and smooth-soled dress shoes, since the village streets are cobbled and often wet or icy. Bulk that works only in dry, continental cold is a poor fit here. For shorter trips, consider leaving your own skis or board and renting instead.
Sources
- What to Wear in Whistler, The Winter Edition
- Ski Trip Packing List: What to Pack + Printable PDF
- What To Wear In Whistler: Seasonal & Activity Packing Guide | 2025 — Sundial Hotel
- Insider's Guide: Dressing for Fall in Whistler
- Whistler Ski Trip Packing List | Blackcomb Peaks Blog
- Whistler Winter Packing List | The Listel Whistler, a Coast Hotel
- Whistler Packing List for Women: What to Pack and Wear - Roman Trail Outfitters
- How To Plan And Pack For A Ski Trip To Whistler
Free: The Ultimate Packing Cheat Sheet
A carry-on capsule wardrobe, the complete packing checklist, layering made simple, and what to wear by season — one printable page you'll use on every trip.
You might also like

Continue reading
More guides you'll find useful